
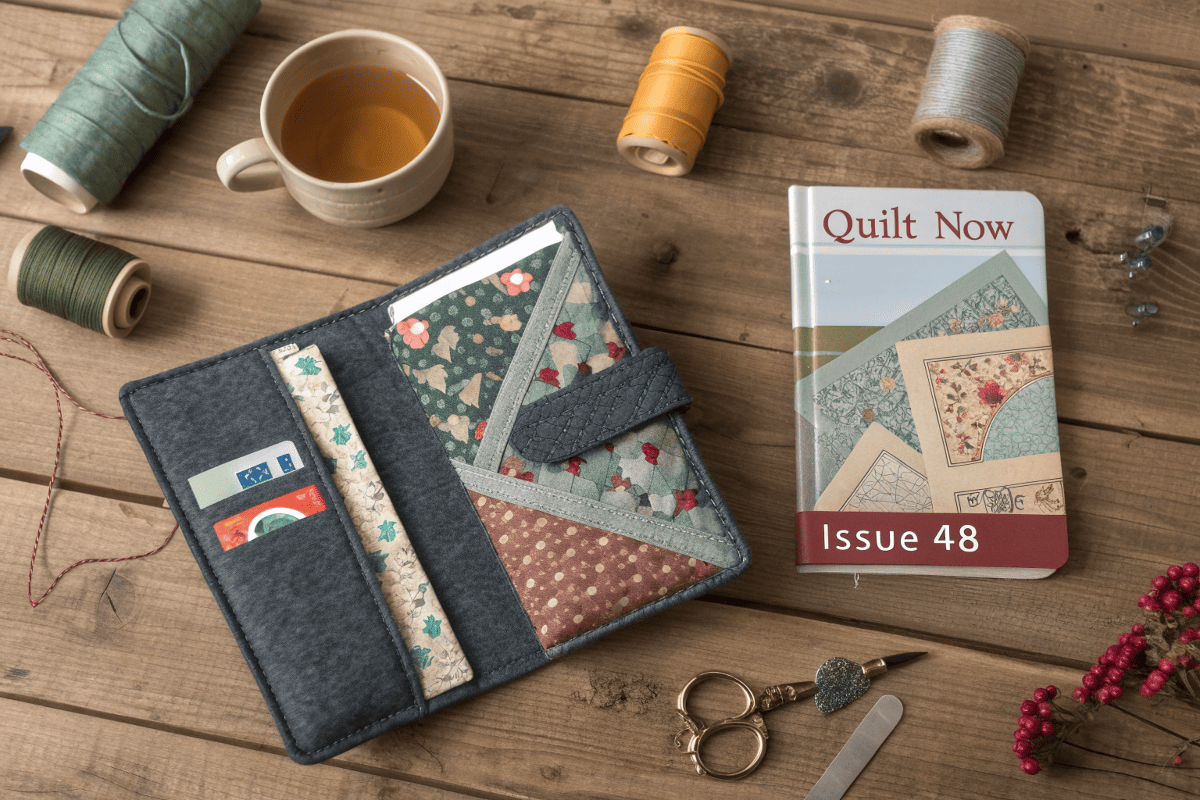
I’m a cover girl this month! This was the last month of original editor Katy Jones producing the magazine, 4 year’s worth of publications in which she was nice enough to publish me in all but 4 issues. She’s been the most flexible editor ever (I mean I don’t think it’s entirely normal to be allowed to just send whatever you fancy making into a magazine, let alone be allowed to do this every single month!) and I shall miss her, but I’m sure she’s heading off to exciting new adventures.
Materials and Tools
Essential Materials
Canvas (12-16oz) provides excellent durability and water resistance for daily travel. Full-grain leather offers premium longevity with beautiful aging. Marine vinyl excels in tropical climates with maximum waterproof protection.
Required Tools
- Heavy-duty sewing machine or sturdy hand-sewing needles
- Sharp fabric scissors (8-10 inch)
- Rotary cutter with 45mm blade
- Metal ruler (18″ steel)
- Scratch awl for precise marking
Closures
Heavy-duty zippers (YKK #5) provide maximum security for main compartments. Magnetic snaps offer quick one-handed operation ideal for rushed travel moments. Avoid magnetic closures if carrying electronic devices frequently.
Design Planning
Document Dimensions
US passports measure 4.9″ × 3.5″ × 0.5″. Create passport pockets at 5.15″ × 3.75″ allowing 0.25″ clearance for easy insertion. Credit cards follow ISO standards at 3.37″ × 2.13″ – make slots 3.6″ × 2.25″ for comfortable access.
Optimal Layout
- Overall folded size: 10″ × 5.5″
- Main passport compartment: 5.15″ × 3.75″
- Credit card slots: 3.6″ × 2.25″ (4-6 slots)
- Ticket pocket: 8.75″ × 3.25″
- Cash compartment: 6.5″ × 3″
Test layouts with paper templates using actual documents before cutting expensive materials.
Construction Process
Cutting Materials
Press fabrics to remove wrinkles. Mark all pieces with scratch awl before cutting. Cut all components at once, labeling immediately to prevent confusion.
Cut List:
- Exterior panels: 10.5″ × 6″ (front and back)
- Interior lining: 20″ × 6″
- Passport pocket: 5.5″ × 4″
- Card slot strips: 8″ × 2.5″ (3-4 pieces)
Assembly Sequence
- Create interior pockets on lining first
- Install card slots with 0.5″ vertical spacing
- Attach passport compartment with reinforced edges
- Install zippers using temporary basting stitches
- Join interior to exterior panels
- Add closure hardware
- Finish edges with binding or burnishing
Professional Techniques
Double-stitch all stress points for durability. Use heavy-duty thread in colors that complement your material. For leather, pre-punch holes with awl to prevent tearing. Maintain 8-10 stitches per inch for optimal strength.
Functional Features
Pocket Construction
Create passport pockets with three-sided construction – sew bottom and sides, leaving top open. Angle card slots 15 degrees for easier one-handed removal. Use interfacing in pocket openings to prevent stretching.
Closure Installation
Mark zipper placement precisely before cutting. Use zipper foot for professional installation. Reinforce magnetic snap locations with interfacing squares to distribute stress and prevent tearing.
Customization Options
Travel-Specific Modifications
Business Travel: Add extra card slots (8-10 total), transparent ID window, and business card compartment.
Family Travel: Create color-coded sections for multiple passports, expandable design accommodating 4+ family members.
Adventure Travel: Use waterproof materials throughout with sealed seams and minimal compartments for maximum protection.
Decorative Elements
Machine embroidery with travel motifs (compasses, airplanes) adds personality without compromising function. Monogramming provides personalization while making wallets instantly recognizable. Color-blocked interiors using bright fabrics improve document visibility in low-light situations.
Troubleshooting
Common Issues
Fabric puckering: Use heavy needles (size 16-18) and adjust tension for thick materials. Thread breaking: Invest in quality upholstery-weight thread and correct needle size. Leather bunching: Make small relief cuts at stress points around curves. Pocket too tight: Always test with actual documents before final stitching.
Maintenance
Material Care
Canvas: Machine wash cold, gentle cycle. Air dry to prevent shrinkage. Leather: Condition every 3-4 months with leather-specific products. Avoid soaking. Waterproof materials: Hand wash with specialized cleaners, reapply treatments annually.
Longevity Tips
Inspect wallets before each trip for loose stitching or worn areas. Address minor issues immediately rather than waiting for major failures. My oldest wallet has survived four years of international travel with proper maintenance.
FAQ
What’s the total cost?
Materials typically cost $25-50, significantly less than $150+ premium store versions.
How long does construction take?
Expect 4-6 hours for fabric wallets, 6-8 hours for leather versions.
Can I make it waterproof?
Yes, using marine vinyl or coated fabrics with waterproof zippers and sealed seams.
What size should I make it?
10″ × 5.5″ folded accommodates all standard documents while fitting jacket pockets.
Do I need a sewing machine?
Heavy-duty machine preferred for thick materials, but hand-stitching works with proper needles and technique.
Conclusion
Creating a custom passport wallet transforms a travel necessity into a personalized companion perfectly suited to your needs. The investment in quality materials and careful construction pays dividends through years of reliable service, superior organization, and the satisfaction of using something crafted specifically for your travel style.
My current wallet has protected documents through Southeast Asian monsoons, European train stations, and African safaris – proving that thoughtful design and quality construction create travel accessories that enhance every journey.
If you’re using natural fabrics like cotton canvas, always prewash before sewing to prevent shrinkage and distortion after the first wash. Learn why this step is essential: Turn Prewash Into the Essential Laundry Step You Never Skip.
To ensure your wallet holds up over time, proper thread tension is crucial. A loose stitch can fail under daily stress. Check your machine settings: Thread Tension Guide.
For precise cutting and clean edges, sharp tools are non-negotiable. Using dull scissors will ruin even the best materials. Discover which tools make the biggest difference: Best Scissors for Cutting Fabric.
If you’re new to sewing or need help setting up your machine for heavy-duty work, here’s how to get started: Set Up Sewing Machine.
Wondering how much fabric you’ll need for future projects? This guide breaks down exactly how big a yard of fabric is and how many pieces you can get from it: How Big Is a Yard of Fabric?.
Need more organization in your life? This wallet is part of a bigger system. Explore practical ways to keep your home and routines running smoothly: How to Organize Your Home in 30 Minutes.
Traveling with family? Pack smarter with our complete checklist for stress-free trips: Travel Packing Checklist for Family Trips.
In October 2025, this piece was fully updated to showcase new materials, improved equipment, and refined methods.


